In the LityxIQ Derived Dataset processing, a Join is equivalent to a join or merge process in languages like SQL or Python. The objective is to join or merge together the data from rows that cross over multiple datasets. The rows are "matched" together across the multiple datasets using what are referred to as "join keys", which are variable(s) across the datasets whose values will be compared for matching. Note that you can also perform what is referred to as a "cross-join" in which all rows from one dataset are matched to each and every row to the other dataset without referring to join keys. It is not required that a derived dataset have any joins defined.
To begin, after opening the settings dialog for the derived dataset (see https://support.lityxiq.com/241959-EditingDefining-a-Dataset-View), follow these steps to define one or more datasets to join.
1) If the Joins panel is not already opened, click on that panel header to open it. Then, click the Add New Join button. Note that if this view had previously been defined, you may see information on the currently defined joins displayed in this panel. In that case, you will have a number of options described below.
Note that the ordering of the join datasets is important. They will be processed in sequence from top down. This matters because new variables will become part of the dynamically processed dataset as joins occur, which in turn may make additional join keys or other processing steps available for later joins that couldn't have been done for earlier joins.
Also, join datasets that have been inactivated will be shown as greyed out and with the label "Inactive".
Add New Join Button - click to add a new join dataset to the processing steps. It will be added at the bottom, and this will open the join settings editor (described below).
Icons - Edit | Copy | Move Up | Move Down | Delete
- Edit - click to edit the settings for the join dataset. See below for a description of the join settings.
- Copy - copy the settings for this join dataset into a new join. It will appear at the bottom of the join list.
- Move Up/Down - these will be available if there are multiple joins. Use these to re-order the join datasets as needed. The order of joins is important as data flows from top to bottom.
- Delete - delete the join dataset
2) The join editor will be available when you click Add New Join, or edit an existing join dataset. The settings are described below.
Dataset & Join Keys Tab
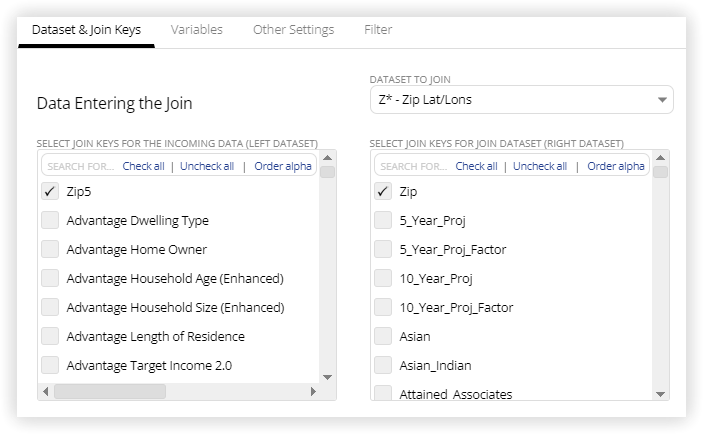
Select Join Keys for Incoming Datasets - Select the join variable(s) from the incoming dataset by clicking the corresponding checkbox. The variables that appear here will be all variables that are currently in the derived dataset as the data flow moves through the Incoming Dataset list and any joins that are above this join. When selected, a variable will move to the top of the list. Selected variables can be re-ordered using drag and drop. If you do select multiple variables, the order is important, and must align with the order of the selected variables in the join dataset box on the right side of the dialog.
Dataset to Join - Select the dataset to be joined to the incoming data. This drop-down provides a list of all datasets available to you. Once selected, the list of variables in that dataset will be shown in the box below.
Select Join Keys for Join Dataset - Select the join variable(s) from the join dataset. The number of variables you select here should be the same as the number selected on the left side, and must align with those variables. Selected variables can be re-ordered using drag and drop. If you do select multiple variables, the order is important, and the selected variables must align on each side.
Note for Executing a Cross-Join - a Cross-Join, also called a Cartesian Join or Cartesian Product, can be accomplished in LityxIQ by not selecting any join key for either side of the join. The result of this is that all rows from the left dataset will be joined with each and every row from the right dataset. The total number of rows in the result set is the product of the number of rows in the joined datasets. This of course can lead to very large result sets that are not always intended, so use a cross-join with care. A cross-join is a form of a many-to-many join, and so to execute it in LityxIQ, you must first enable many-to-many joins (and therefore also cross-joins) using the checkbox explained further below on the Other Settings tab.
Variables Tab
Variables to include - on both the left side and right side, select the variables to include in the output dataset from this join. The list of variables on the left side includes all variables that are currently in the view as the flow of data has moved through all Incoming Datasets, and all joins above this one. The list of variables on the right side includes all the variables in the selected join dataset.
Select All - check this box on either side to automatically include all variables from the list. This will be true even if the variable change from one run to the next. By default, Select All is checked on the left side.
Identification Variable - on each side, you have the option to create an additional variable(s) that will be added to the resulting dataset that helps track from which dataset rows originated. Leave the boxes empty if you do not wish to do this, or you can use just one of them. If used, the variable(s) will be populated with either a 1 or a 0 for each row in the dataset. It will have the value 1 if that row originated from the dataset (left or right, depending on the Identification Variable), and a 0 if not. Note that the two variables could each have a 1 in a particular row (meaning the row originated from both sides of the join), or could have one of the variables be a 1 and the other a 0 (meaning it originated from just one side of the join). However, if both variables are used, they cannot both result in 0. It is guaranteed that these variables, if used, will not have any null values from this join.
Other Settings
Keep all records from the left dataset - Some records will have values of the join key(s) that don't match a record from the other dataset. If this box is checked, all records from the "left" dataset (the incoming dataset) will be kept whether or not there is a matching record in the "right" dataset (the joined dataset). In that case, variables from the right dataset will be set to 'missing' for those records. If this box is unchecked, such non-matching records from the left dataset will be removed.
Keep all records from the right dataset - Similar to the explanation above.
Suffix for overlapping field names in the left dataset - If there are variable names in the two datasets that are the same, there needs to be a way for the resulting dataset to include both. The string provided here will be used as a suffix for the overlapping variable names for data coming from the left dataset (default is "_x").
Suffix for overlapping field names in the right dataset - Similar to above, the string provided here will be used as a suffix for the overlapping variable names for data coming from the right dataset (default is "_y").
Join Dataset Required for Data Refresh - Checking this box will require that the selected join dataset is fresh before the underlying view runs, if it is set to execute "upon data refresh".
Allow Many to Many and Cross-Join - Checking this box will not perform a many-many check when the join is executed, and will allow a cross-join. Only check this box if you understand your data well and know that a many-many join can lead to unexpectedly large datasets in some circumstances. By default it is not checked to safeguard against unintended consequences. If unchecked, and upon execution it is determined that this leads to a Many-to-Many join, or you attempted a cross-join, you will receive an error.
Activate: To temporarily inactivate this dataset from being processed as a join by the derived dataset, uncheck this box.
Filter Tab
For more information on how to use the filter dialog, see the following article: https://support.lityxiq.com/806706-Using-the-Filter-Dialog
3) When finished, click Save Changes. This will return you to the main derived dataset settings dialog. Click Cancel to cancel any changes you have made.